Monday, March 5, 2012

The Fondant test..

I decided to try work with fondant but the thing is, you cant buy the ready made thing in Italy and  anyway, its tastes pretty bad. so i made my own using this kind person's recipe.
it went alright, but for rolling it into a gigantic sheet for the cake. this was impossible!
This weekend i made a baby themed party table with a half fondant covered chocolate cake, made from my usual black magic cake recipe
 fondant covered vanilla cupcakes (recipe below) and royal iced chocolate biscuits, recipe here

sleeping baby
working with fondant on small things like cupcakes is fantastic. except every speck of dust and lint is attracted to the fondant!!! its incredible how it picks up anything in its path!!. and if you over work it... it gets crumbly and cracks. yay.
baby shoes and imprinted icing. look around for any interesting textures you may have around the house and press them into the fondant! lots of fun, just make sure they are clean first!
this is a royal icing flower made with a wilton 2D icing tip. i made it before and let it dry first. the leaf is from fondant with a leaf cutter gadget thing.
some biscuits marked with D. 
if you had time, a few nice plates and glass bell jars this could really look spectacular at a party. but i have none of those things and besides, my colleagues at work ate up all the evidence


cake iced with white royal icing from a pattern i found on the internet. came out fantastically in spite of the gas oven that is my burden! because... i bought an oven thermometer!!!! yay
thanks to a friend, i found a fantastic baking shop in Rome!!! it has nearly everything i could ever need. its called Peroni and is in Piazza dell Unita.

flowers out of fondant


Vanilla Cupcakes

125gr butter (softened but not runny)
1 cup flour
1.5 tsp baking powder
125gr sugar (normal white sugar or castor sugar)
2 eggs
1 tsp vanilla esscence
3 table spoons milk

1. cream butter and sugar into a pale very fluffy mixture (beat for a long time2)
2. add eggs one at a time, mixing well after each, then add vanilla, mix well
3. add sifted flour and baking powder, alternating with milk. (start and end with flour)
4. spoon batter into cupcake cases until just over half full
5. bake at 200'C for about 12 min

xxx

Saturday, March 3, 2012

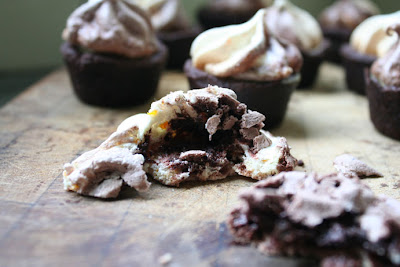
Chocolate orange meringues

this is one of the meringues ontop of a chocolate cup filled with orange filling...

these double flavoured meringues are very moreish so watch out
now, these are blood oranges. this is my first experience with them and when i peeled one to eat it i got a shock, it was almost revolting really. cut like this they don't look to strange but it really made my stomach turn to look at them. it looks like someone has literally injected blood into an orange (closely followed by an evil laugh)
creepy but beautiful. i wanted to use these in a recipe so i made orange filling for my chocolate  cups but.. i didnt like the filling in the end so im just showing you the oranges really, no recipe for this part. 
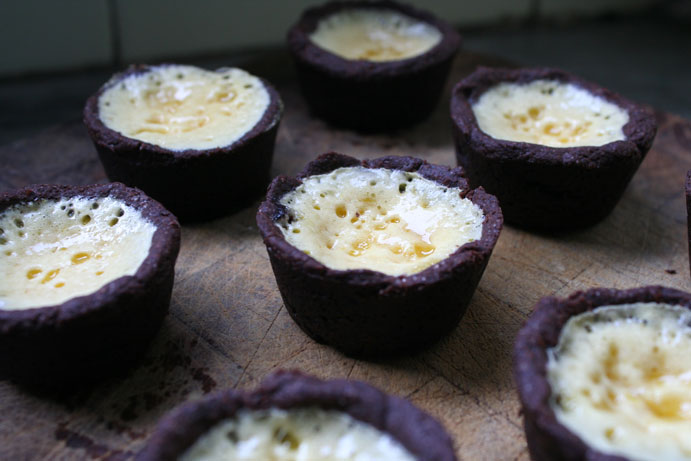
mini cups like this are perfect for rich, sweet bites

yum! the inside of these meringues are chewy and chocolatey with  bitter orange , mmm so good! 


this is a fantastic chocolate ball of unbaked tart crust. it is so rich and delicious, definately will make it again soon. its like cookie dough and  a good  bit of it did not make the oven

Recipe for the chocolate dough crust:

adapted from The Australian women's weekly- Sweet old fashioned favourites, recipe book.
for one 24cm tart/pie

185gr flour
30ml cocoa powder
125gr butter, chopped
1 egg yolk

- mix flour, cocoa, rub in butter with fingertips until combined. add egg yolk and mix until ingredients cling together. add a little water if you need.
- knead dough on a floured surface (more like press together until it forms a smooth dough) wrap in clingwrap and refrigerate for 30 min
- roll out between 2 sheets baking paper. lift it into the tin, press into the sides of the tin and trim the edges.
- put baking parchment paper in tin over dough, fill the paper with dried rice or beans, bake uncovered on 180'c for 15 minutes. remove parchment and beans and bake for a further 10 min.
- pour in your filling of choice and bake according to those instructions.
for small tarts like this, there is no need to bake  them blind (put beans/ceramic beads inside it when you bake beforehand). but they do need to be baked for about 15-20 min by themselves before you put the filling in.
tarts and blood orange filling (did not like how the filling came out, so there is no recipe for that but this rich chocolate crust recipe is here and it will taste good with whatever you fill it with!)

on buttered and cornfloured baking paper (not wax paper or tinfoil!) piped and ready to go!
Recipe for Chocolate-orange meringues
from Easy living but slightly adapted


Ingredients

· 3 large egg whites

· Pinch salt

· 175g (6oz) caster sugar 

- 2 tbsp finely chopped orange rind

- 4 blocks grated dark chocolate
- 2 tbsp cocoa powder

method

1. Heat the oven to 140°C (gas mark 1), and line two baking trays with baking paper.

2. Place the egg whites and a pinch of salt in the bowl of an electric mixer. Using the whisk attachment, beat on a low speed for 1 minute, then increase the speed to medium and whisk for 2-3 minutes, or until the egg whites form fairly stiff but still moist-looking peaks. If you lift the beater out of the bowl, the mixture should look fluffy and cling to the beaters.

3. Continue to whisk, gradually adding the sugar a tablespoon at a time until all the sugar has been added and the mixture is stiff and glossy - this may take 5-10 minutes. 
beat and beat until your eyes go squint and arms starts detaching itself from your body. beat until the misture looks like this. smooth, thick and glossy and it holds its form.
4.divide mixture between two bowls. to one bowl Gently fold in orange rind with a spoon, using large gentle strokes and turning the bowl as you go. Continue until evenly distributed.
chocolate and orange

5. FOR CHOCOLATE MERINGUE bowl: Fold 2tbsp sifted cocoa powder and 40g (1¼ oz) finely chopped or grated dark chocolate into the mixture. 

this is a strange pic i know. but it is looking into the piping bag, you put the two flavours in  on either side and when you squeeze, it comes out two-toned!
6. make/ get a big piping bag, put nozzle on end, i used a large star shaped nozzle. although you can always just snip off the tip of the bag at your desired diameter. spoon orange meringue mixture only onto one side of the bag but spread all the way down from the nozzle to the opening of the bag. spoon chocolate mixture only along the other side, evenly all the way down to the nozzle. now when you squeeze the bag you should get a two coloured flow of meringue!

7. Bake for 30-40 minutes (swapping the position of the tray after 20 minutes), or until pale and dry. Turn off the heat and allow the meringue to cool in the oven with the door slightly ajar.

buon appetito!


Saturday, February 25, 2012

Scones and strawberries

warm buttermilk scones in the morning. what a great way to start the day. so, everyone knows how to make scones right? WRONG! i dont know how to make them. yes, admittedly i have never made these most common and delicious tea time treats mainly because ive heard so many people say; i can never get scones right or mine always flop and turn out as hard little bricks! so it is fear that has kept us apart my scone. 
but never again! i have conquered the mighty scone! eh hem pardon me but..

...That?! are those the scones you made?
yes of course! those are my gorgeous scones! can you not see this?!
well.. they dont really look like scones, they look like biscuits..
well alright, they arent really picture perfect but they do taste like scones.
okay then, hand one over
yesterday when i was buying lunch, the strawberries called to me. they actually said, "buy me and eat me im so freaking delicious" that is literally what they said. to me. so i bought 2 small punnets because at the till the guy enlightened me to the fact that buying 2 miniature punnets was on a not very special special. and i so i bought 2. i ate one punnet immediately and the other punnet journeyed around with me the entire friday in my handbag. do you know what strawberries smell like in your handbag?? not good i tell you! not good! and saturday morning though, they turned into these.
having a bit of a british craze since i went to visit my family in Birmingham
i brought back some british mugs and tea towels and now having scones i feel like a real old pom. actually its just because they have such great sweets there and my subconscious loves sweets. i ate my weight in chocolate at Cadbury chocolate factory while i was in birmingham. now im on weighless.

i was so proud and served these little numbers as breakfast in bed.
"oh, thought they were mini hamburgers"
grr..
also, going through a bit of a strawberry print craze at the moment and would be going crazy eating strawberries if the were in season and a little cheaper!


Buttermilk Scones Recipe:

Ingredients:
450gr self raising flour
1/4 tsp salt
60 gr butter
430 ml buttermilk

1. sift dry ingredients together and rub in chopped butter. stir in enough buttermilk to make a soft sticky dough
2. turn onto a floured surface and knead very lightly, just until its smooth. press it out to 2.5 cm thickness and use cutters to cut 5cm rounds.
3. brush tops with egg, place on baking paper and bake in very hot oven (200-220'C) for 15 min.

eat with cream and strawberries or strawberry jam ;)

Friday, February 17, 2012

Fresh Bread rolls for breakfast

Take one of these rolls, add eggs, bacon and sausage and you have yourself a mighty fine breakfast!

so, a few weeks ago we had no bread and we wanted bacon and eggs for breakfast. all the shops in Rome were snowed in and shut, so there is no hope of buying bread, at least we had yeast in the fridge.

baked and bready, one was already gone before they were even cool. note that the longer time you leave the dough to rise, the more airy your dough will be.

knock on them like a door and if they sound hollow they're ready.

the recipe is quoted from yourhomebasedmon's website here

but i adapted it a bit, added less sugar, brushed them with oil and sprinkled salt and mixed herbs on top

1 C plus 2 Tbsp warm water
1/4 C oil
2 Tbsp yeast
1/8 C sugar
1 tsp salt
1 egg
3 1/2 C flour
Heat oven to 400 degrees.
In a bowl combine the water, oil, yeast and sugar and allow it to rest for 15 minutes.  Using your dough hook, mix in the salt, egg and flour.  Knead with hook until will incorporated and dough is soft and smooth. (Just a few minutes)
Form dough into 12 balls and then place in a greased 9 x 13 pan and allow to rest for 10 minutes.  Bake for 10 minutes at 200'C or until golden brown.


Tuesday, February 14, 2012

Shortbread love

Happy Valentines day everybody! hope you have been spoilt and loved. 

if you havent been feeling much  love and feel that this is a commercialized  hoax of a holiday then..
make shortbread. comforting comfort food complete with almonds and chocolate. snuggle down with a good movie and mug of hot chocolate and enjoy. (scroll down for recipe)
having just been to cadbury world in birmingham, i have really had chocolate on the brain. i was practically living on it last week so naturally when i got home, the first thing to do was bake with it. i remember my friend Cally having a rather good shortbread recipe and i thought, shortbread goes well with chocolate,  it being valentines day and all, one thing led to another and these bites were born.

my gran makes very yummy shortbread cookies topped with a blob of chocolate and an almond, so i think i was also longing after those a bit when i made these

fill a piping bag with melted chocolate of your choice and drip it over your biscuits, its a lot of fun!
you can use more than one type of chocolate in more than one way to decorate these babies.
in this case i piped the dark chocolate hearts, let them harden and then piped the white chocolate on top

all packaged and ready to spread the love at work :)
Cally's famous Scottish shortbread:
Now, she does claim that you have to have Scottish blood in you to be able to make these properly. So the poor suckers who arent of scottish descent (myself included), i suppose shall just have to be content never being able to create scottish shortbread. i can live with that.

1 cup butter
1 cup sugar (probably better if you use castor sugar but anyways)
3 cups flour
whole blanched almonds (if using)

1) cream butter and sugar until fluffy
2) add 2 1/2 cups of flour and mix well. collect into a dough
3) use last 1/2 cup of flour to cover surface of counter.
4) roll out dough until about 1cm thick, cut out with cookie cutters.
5) press whole, blanched almonds into the centre of each cookies if using almonds
6) bake for 30min or until slightly brown but they should be as pale as possible.

to decorate:
melt chocolate of choice in the microwave or however you like to melt it. be careful not to burn it or get water in it.
pour it into piping bags that you have made or bought (or a plastic ziplock bag/sandwich bag works well for this). snip off the end or a corner of the bag to the thickness you want the chocolate stream to be. and drip all over your shortbread!
note: if you are using two kinds of chocolate like dark chocolate hearts with whits squiggles ontop then wait for your dark chocolate to harden before drizzling the white ontop.

Saturday, February 4, 2012

Valentines day cookies

Sweets for your Sweet


theres a white blanket over everything in rome at the moment, so spread a little cookie love and snuggle down on the couch with a good movie

  
chocolate sugar cookies decorated with royal icing

how do you buy your icing sugar? how about in 125gr packets with a whole lot of wasted packaging materials!


even little piggies can be cute!

you could put the in a box with tissue paper, eat them straight away, give them away to your darling, your mother or  the bergie on the corner, they will still taste good and be welcomed with open mouths :)


and then these, a few squirrels thrown in the mix. the one in the orange jumpsuit is called  Dr Evil
and i got a new power tool! who new black and decker made mixers!

this is what they look like when baked
Recipe for chocolate sugar cookies:
quoted from joy of baking

Chocolate Sugar Cookies:

2 3/4 cups (355 grams) all purposeflour

3/4 cup (75 grams) unsweetened Dutch processed cocoa powder

1/2 teaspoon salt

1 teaspoon (4 grams)baking powder

1 cup (227 grams) unsaltedbutter, room temperature

1 3/4 cups (350 grams) granulated whitesugar

2 largeeggs

2 teaspoons pure vanilla extract


In a large bowl whisk together the flour, cocoa powder, salt, and baking powder.

In the bowl of your electric mixer (or with a hand mixer), beat the butter and sugar until light and fluffy (about 3 to 4 minutes). Add the eggs, one at a time, beating well after each addition. Add the vanilla extract and beat until combined. Add the flour mixture and beat until you have a smooth dough.

Divide the dough in half and wrap each half in plastic wrap. Refrigerate for about one hour or until firm enough to roll.

Preheat oven to 350 degrees F (177 degrees C) and place rack in the center of the oven. Line two baking sheets with parchment paper.

Remove one half of the chilled dough from the refrigerator and, on a lightly floured surface, roll out the dough to a thickness of 1/4 inch (1 cm). (Keep turning the dough as you roll, making sure the dough does not stick to the counter.) Cut out desired shapes using a lightly floured cookie cutter and transfer cookies to the prepared baking sheet. Place the baking sheets with the unbaked cookies in the refrigerator for 10 to 15 minutes to chill the dough which prevents the cookies from spreading and losing their shape while baking.


Note: If you are not going to frost the baked cookies, you may want to sprinkle the unbaked cookies with crystal or sparkling sugar.


Bake cookies for about 10 -12 minutes(depending on size) or until they are firm around the edges. Remove from oven and let cookies cool on baking sheet for a few minutes before transferring to a wire rack to finish cooling. Frost with royal icing, if desired. Be sure that the frosting on the cookies dries completely before storing. (This may take several hours.) Frosted cookies will keep several days in an airtight container. Store between layers of parchment paper or wax paper.

Makes about 36 - 4 inch (10 cm) cookies.